Honda Ridgeline Owners Club Forums banner
41 - 60 of 99 Posts
Hi, I know I'm responding to a fairly old post here, but figured someone here might now... I'm getting ready to replace the front door speakers and tweeters, leaving the stock amp and head, and was wondering if there's a crossover between the stock door speakers and tweeters or if the frequency split happens in the amp and they're all just directly wired?
 
End[/quote]


Fantastic Post! I am inquiring about the last picture with your JL Audio 8" micro sub box.

I too am looking to install an JL Audio micro sub, except with the built in amplifier. Here is the weblink for reference:ACP110LG-TW1 - Car Audio - Subwoofer Systems - MicroSub+? - JL Audio

Question, an 8-inch is too small for my audio needs. However, the 10" single sub TW1 amplified will be perfect.

The dimensions on this enclosure are:
External Width (W) 21 in
External Height (H) 13.5 in
External Depth (D) 6.625 in

The only one that seems to concern me is the Height, laying it down like your enclosure with the JL lettering facing upwards, the 8 inch box. Here are the 8" Micro sub dimensions:
External Width (W) 18.5 in
External Height (H) 11.125 in
External Depth (D1) 5.125 in.

The Height, again laying down with the JL lettering facing upwards, is 11.125 in. I see it fits underneath the Rigdeline's Right rear location without any issues.

The 10" sub enclosure is only 13.5 in, will that fit?
It is only about 2.4 inches wider.
If it can't sit exactly flat, that is alright.
As long as the seat can fold down on top of it and lock.

Any opinions or feedback is greatly appreciated.


Thanks I am going to be purchasing the G2 in 2018, here in a few months. Just trying to pay off some bills first.

It will be a 2018 RTL-E in Obsidian Blue Pearl. That much I know :wink:


Fantastic Post! I am inquiring about the last picture with your JL Audio 8" micro sub box.

I too am looking to install an JL Audio micro sub, except with the built in amplifier. Here is the weblink for reference:ACP110LG-TW1 - Car Audio - Subwoofer Systems - MicroSub+? - JL Audio

Question, an 8-inch is too small for my audio needs. However, the 10" single sub TW1 amplified will be perfect.

The dimensions on this enclosure are:
External Width (W) 21 in
External Height (H) 13.5 in
External Depth (D) 6.625 in

The only one that seems to concern me is the Height, laying it down like your enclosure with the JL lettering facing upwards, the 8 inch box. Here are the 8" Micro sub dimensions:
External Width (W) 18.5 in
External Height (H) 11.125 in
External Depth (D1) 5.125 in.

The Height, again laying down with the JL lettering facing upwards, is 11.125 in. I see it fits underneath the Rigdeline's Right rear location without any issues.

The 10" sub enclosure is only 13.5 in, will that fit?
It is only about 2.4 inches wider.
If it can't sit exactly flat, that is alright.
As long as the seat can fold down on top of it and lock.

Any opinions or feedback is greatly appreciated.


Thanks I am going to be purchasing the G2 in 2018, here in a few months. Just trying to pay off some bills first.

It will be a 2018 RTL-E in Obsidian Blue Pearl. That much I know :wink:[/QUOTE]


Anyone have any information?

Thanks in advance.
 
Coming late to this post. I am about to drop 2K on a stereo upgrade. They plan on putting a new amp it that will give the OEM sub 100 watts. The shop had never done a G2 RL and felt keeping the OEM sub and adding more power to it...while adding new front speakers would do the trick.

Does anyone know the power rating of the OEM sub?
I went with this:

https://www.crutchfield.com/p_13693330/JL-Audio-ACP108LG-W3v3.html


ALONG with keeping the stock subwoofer, NO REGRETS whatsoever...and neither will you.

$2K is a hefty budget...I put Polk Audio components in the front and 2-ways in the rear doors as well. Also, had the audio jockeys put 80mil noise damping material in the doors and had the front windows tinted, all for under HALF your budget.

The 10" version would've been even better I suppose, but It wouldn't tuck in so neatly as the 8"- tho the 8" JL Audio is about as good as many premium 10" SW's at the $400 price point. I actually got mine used/like new from Ebay when they were running a 10% Ebay bucks promo for about $250.
 
@it8ezbngrn and @NYbiomed and others installing an amp in a RTL-E/BE:

How did you handle the inputs? Considering we have the 540watt factory amp, the high level inputs will be pretty high voltage (I'm guessing 15-30v), which is too high for many built-in high-level inputs on amps. Are you using external LOC's that can handle the input voltage, or did you wire into the speaker outputs before the factory amp, or are you just living with clipping?

I'm looking at the Microsub+ which has a built in DCD amp, however, the high level input shows a 5v RMS max. (It could probably peak a bit higher without clipping). I think this is still too low to simply pull the existing high-level wires from the stock sub and pipe it into the JL.

I appreciate your input.
 
So shame on Crutchfield sales, but props to Crutchfield support. I got a "scratch and dent" deal on a 8" microsub+, and the sales guy confirmed while it might be slightly damaged, it would contain all the pieces to function. Well it arrived today, and of course was missing the accessory packet and did not include the removable plug adapters for the amp, so I can't wire it up. I called support and they're going to ship me a brand new 8" microsub+ for the hassle which is cool I guess. (Funny thing is the sub itself actually had no visible "damage"). So while I wait a week for the replacement microsub, I figured I'd share my notes and a couple pictures so far, for anyone interested in this process...

I did a couple tests of a 50hz sine wave to the sub, to see what kind of high level voltage is coming across those wires:

-50hz at volume 25, with bass and sub selectors in middle = 7.1 volts AC
-50hz at volume 30, with bass at middle, and sub at max = 10 volts AC

Both of these are higher than the 5 volt max RMS JL wants on their high level inputs, but not by as much as I feared. I called JL and asked a couple questions:

(1) Can I vampire tap the existing sub wires, and run both the stock sub and the JL off that signal? (I'm not sure how the ohm resistance works in this case, as I expect the JL would have high resistance, and the stock sub would still get the lion's share of signal).
*Answer: It's not the recommended install method, as you could get a feedback situation where the 2 subwoofers create a signal for each other across the same speaker wires. However, it won't hurt anything to try it, at most you will notice strange distortions which disappear when you unplug the stock sub.

(2) The stock sub has only 1 pair of speaker wires, though the JL is expecting 2 pair (left/right, pos/neg), how do I handle that?
*Answer: Pigtail off each positive and negative lead, so that you have 2 positive and 2 negative to attach to high level input.

(3) Will the JL amp be damaged if the input voltage on the high-level inputs is too high?
*Answer: There is no circuit protection on the high-level input, but it shouldn't damage anything. What you'll notice, is that the sub will distort very early in the gain raising, and you'll be unable to compensate for the overpowering input. If your input is too high in volts, suggest using an Audio Control LC2i which can handle and down-step the voltage to appropriate levels for the JL amp.


----------------
Here are some notes for those of you interested in getting at the stock sub, and then some pics:

The rear seat comes off as 1 unit, and is heavy and awkward to move, so don't pull it if you can help it. The sub is on the passenger side behind the seat at the bottom, and the red and white speaker wires connect directly at the bottom far passenger side. I'd suggest you first try just popping off the plastic trim pieces at the bottom of the seat to see if you can get what you need (pull directly forward towards the front of the cab to release).

If you still can't access what you need, fold up and lock the rear seats and finish pulling all of the lower plastic trim pieces. Then pull the 2 2" plastic covers at the top near the rear window, which cover the hook holes. Use a 14mm socket to remove the 8 bolts holding the seats, plus the single 14mm bolt holding the seatbelt which would get in your way upon removal. There are 9 bolts total to remove (35-39 lb-ft to retorque). Move the loose seatbelt up out of the way, then lift the entire seat assembly up out of the 2 hook holes. Getting it out of the truck is a real pain by yourself, and with our venerable narrow door openings (moving the front seats forward helps with angles).

The stock sub is purpose built and quite thin in spots, so I don't think you're going to be able to remove it and put anything better in its place at that location. Here are some pics:

Image


Image


Image


Image
 
I got the replacement 8" microsub+ and an LC2i in case I needed it, and we finally had temps low enough I could get this thing installed!

Last time I noted that with a 0db 50hz test tone at 25 volume, and bass and subwoofer sliders in the center, the voltage output from the stock subwoofer speaker wires was 7.1volts.

Today I also did a couple scope tests, and saw that with the same 0db 50hz test tone and subwoofer slider in the middle, the peak volume I could go to before clipping from the factory amp was volume 27. (I think most recorded music is like -6db, so most of you can probably go to 33 or so before clipping with normal music).

....this was one of those projects where nothing really came together right. I had a bear of a time getting the power wire through the firewall, as I didn't want to drill a hole. It seriously took me 2 hours just to run the power wire, and I'll post a couple pics to help the rest of you...The place to get through the firewall is tucked away behind everything and hard to get at from both the engine bay and the interior. There's a sealed boot on the bay side, which I went ahead and snipped a small hole in so I could feed the power wire through while taped to hanger wire. It was still ridiculous trying to get the right angles to feed it through the hole, but I finally got it:

Image


Image


Image


...then once I finally finished with that, I spent far too long dicking around with trying to grind my ground wire end larger to fit over the 14mm rear seat frame bolts, when I finally realized I didn't want to do that, and there was a small 10mm factory ground right there! D'oh

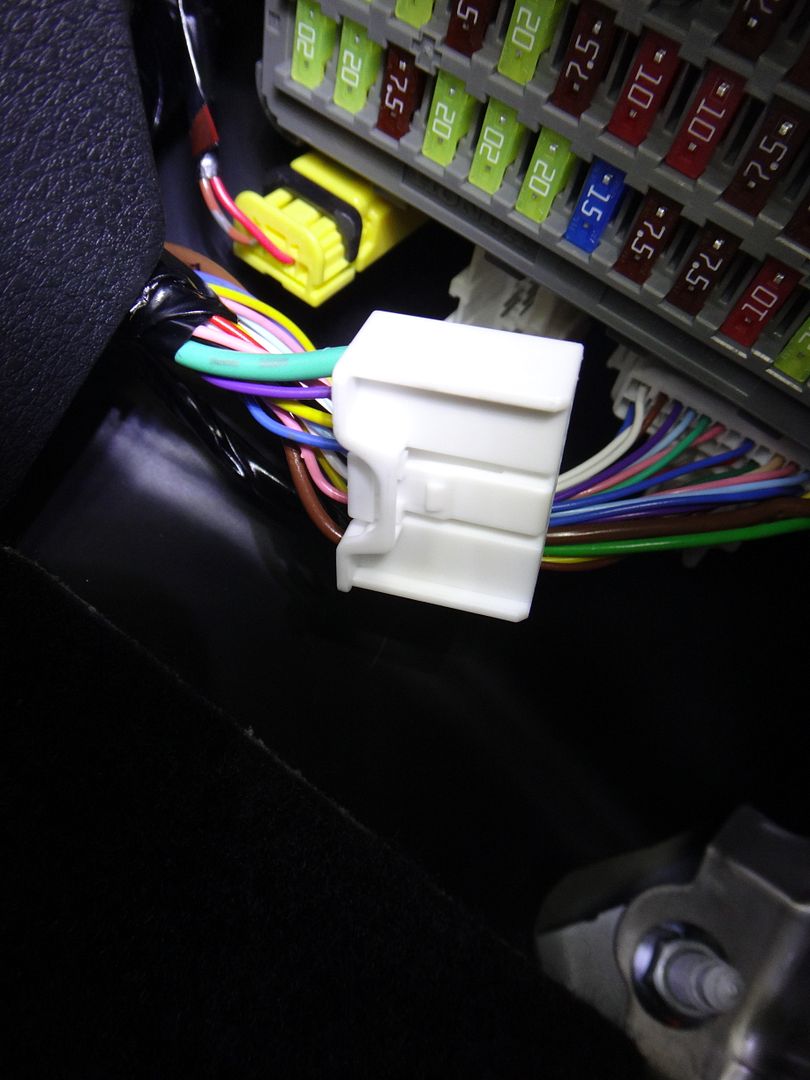
The vampire taps to the factory sub wires went fine, and I excitedly hooked everything up to the Microsub+ and....nothing. No sound, no pop, no power light. I measured everything with the multi-meter, and had voltage and ground, and even jumpered over a remote wire in case the auto-turn-on stuff wasn't working....nope, still nothing!

After breaking for dinner, I began to recall a buddy once telling me to never trust the old glass fuses for amp power wires. I guess they have a tendency to get too hot in the engine bay, and actually de-solder themselves inside the cap ends...so they'll look peachy on visual inspection, and per my findings today, even possibly show 12v on a multimeter. However, when you try to pull any kind of load through them, the voltage tanks because there's no real connection there. Well sure as sheet, that was exactly the power problem! I pulled my old glass fuse (same style as the one picture below), and tossed on a flat fuse I got from a wiring kit, and problem solved! woohoo green power light on the Microsub+!

Image


So then as I was testing with my 50hz test tone, I just couldn't level match anything at all. JL Audio support was right, and the high voltage inputs from the factory line straight to the microsub+ inputs were just too much. I tried cutting 1 pair of the high level inputs to lower the overall input level, but this didn't work, as the JL auto-turn-on functionality would no longer work. So I went ahead and tapped in power/ground for the LC2i and put the high-level inputs there, with RCA's from the LC2i to the JL amp. I also used the L2Ci's auto-turn-on, and remote out to send the remote to the JL amp. I played around with some tests and level matched by ear as best as I could, leaving the "accubass" stuff disabled, but can still only get about 1/4 LC2i gain and 1/4 JL gain before I start hearing what sounds like distortion (though the port chuffing from the box is throwing me). I'll play some more tomorrow.

The only other thing of note here, is that the JL Support guy was right again... I had left the stock sub hooked up, and was running both, and it just wasn't sounding right, and flipping the phase on the JL didn't fix it. I finally remember that he had said there could be some strange feedback between the two subs, so I pulled the clip for the stock sub and the JL sounds and feels much more alive! I can't explain what the problem is, if there really is some sort of pressure interplay back-feeding signal down the wires, or if it's just some phase issue that's not 180 degrees out. But I guess I'm leaving the stock sub unplugged.

I dig the JL, but at the moment it's not quite measuring up to the $450 price tag. The port noise is bugging me at higher volumes, though I don't have the rear seat re-installed yet, and I'm sure that'll change the dynamics some. I'll also try to volt-measure the RCA's off the LC2i to ensure I'm not over-feeding the JL. If I find anything else interesting I'll come back and update this post. For now, I'd suggest the sealed JL PowerWedge+ 10" in the same spot would probably sound better. I'm not hating on the 8", I'm satisfied with my purchase (with the discounted price I got), but it just hasn't wowed me yet.

**Update: I confirmed the LC2i can put out 9.5 volts to the RCA's and since the JL amp only wants like 1.5v max, it makes sense that the gain adjuster on the LC2i can't go above about 1/4 turn. I did a bit more tweaking of the setup, and really like the "musicality" of the 8" sub, and I think if I could flip it around to stuff that port over against the door, perhaps I wouldn't be so bothered by the chuffing. However, my wires won't reach the extra 2 feet to flip it, and when thinking about purchasing extra wiring/adapters I decided I'd rather just try out that 10". So I'm working with Crutchfield to pay a bit more $$ and exchange for the sealed 10". I'll do another post to write up what I think of it compared to the 8". For someone who wants a deal on a perfect condition open-box 8", keep your eyes on Crutchfield page over the next couple of weeks ;)
 
....this was one of those projects where nothing really came together right. I had a bear of a time getting the power wire through the firewall, as I didn't want to drill a hole. It seriously took me 2 hours just to run the power wire, and I'll post a couple pics to help the rest of you...The place to get through the firewall is tucked away behind everything and hard to get at from both the engine bay and the interior. There's a sealed boot on the bay side, which I went ahead and snipped a small hole in so I could feed the power wire through while taped to hanger wire. It was still ridiculous trying to get the right angles to feed it through the hole, but I finally got it:
LOL, same thing happened to me on the door, it took longer for me to run wire through the door to the tweeter from the crossover, than installing a new headunit and speakers and noico... I was sweating bullets and getting very frustrated. Went online and someone suggested spraying the clothes hanger and wire with WD-40, so I did that once I ran the red power wire from the battery through the firewall, took only a few minutes, and I almost cried as a result... good learning lesson.

Great post with the pictures and information!
Yeah I was using hand soap for wire lube, but will have to give WD40 a try next time. I am thankful I didn't have to run wires from door to pillar, and feel for ya!
 
So I did get the sealed 10" JL Powerwedge+ and got it installed today. I've still got some fine tuning to do, but will wait until I get the seat back in. Overall it sounds great, and as you would expect, it goes a little lower than the 8", but isn't really any louder. Though at peak volumes, it is a fairly linear output through its range, unlike the ported 8" which definitely had boom at port tuning. Best of all, no port chuffing, and I do like the bonus of it reaching just a little bit lower for my type of electronic music. I'd say it's nearly as musical as the 8" and blends really well with the Polks. Like last time I did have to disconnect the stock 8" subwoofer, as there was some weird interplay between the 2 subs, but just the 10" is plenty loud. In fact, I have to figure out a way to keep my thinkware camera's shock sensor from going off when I have it cranked, as the shock sensor is triggering on heavy bass hits :act035:

I feel like you don't need the LC2i if you're just doing a sub like this on the RTL-E or BE. Just get a decent LOC that can handle the heavy voltage drop needed, but otherwise I'm not using any of the other features of the LC2i really.

You could probably get a nice 4 channel amp, and decent prebuilt and loaded sub enclosure for the price of the JL and LC2i, then you could run your fronts off 1 side of the amp, and bridge the other side to the sub. If I did it all over again, I'd probably go that route, as the 10" can swamp the polks if I crank it (showing they really want to be amped). I'm done with audio upgrades for now though, and really happy with the system. I have a feeling the JL will grow on me, and at some point my pocketbook will heal :rolleyes:

Image


Image


Image
 
So I know just enough about car audio to be dangerous... >:)

I cant see the pictures in it8ezbngrn first post so I am curious if someone can clarify, show a picture, of where they are getting the remote line from.

Also, are you just tapping into the factory subs line to go into your LC2i and keeping the factory sub running or are you completely disconnecting the factory sub?

Any help is appreciated!

TIA
Disregard my previous statement about using the yellow wire in the second harness, it appears to be a 12V constant. If you connect to that, then your amp will probably stay on all the time, which will drain the battery within a few hours.
 
I can't see the initial picture posted by the OP either. Can someone please either re-post it, or indicate what you tapped into for the remote wire? I'm leaning towards just using the cigarette adapter wire in the center console, or chasing it back to the fuse panel.
 
41 - 60 of 99 Posts