Edit: Post 22 gives the wiring instructions.
Read as many of the horn install threads that I could find but didn't see any that were comprehensive and could take a rookie (like me) from beginning to end. I'm mechanically inclined like a lot of people on this board but have never messed with horns before. The first time I read about installing a relay, it seemed rather complicated but once I saw a diagram, it's really not that bad. Hopefully this post will encourage those of you that are thinking about tackling this upgrade to get out in the garage and do it!
I'm still not finished and have one part on order (horn adapter wire) so I will come back and update this post with the wiring info in a few days when the part gets here. In the meantime, I will list all the parts needed and show you how I installed the new horns. The good news is that some of the posts said you can't do this upgrade without removing the front end but I'm here to assure you it can be done (and fairly easily). Only took me an hour or so to make a custom bracket and install the horns. I even unhooked the wire from the old horn just to make sure it can be done (removing the battery when I actually complete the wiring will make it a lot easier).
First, total cost should be around $50-$60 and that's assuming you don't have a piece of scrap metal laying around to make the bracket. And the radiator support has two welded nuts on it where you will bolt the custom bracket (no drilling on your precious truck!). Here's what you need:
Hella Horn Kit $30 (has really good reviews on Amazon but any two horn kit will work) (and it comes w/relay which is the right way to hook it up)
https://www.amazon.com/gp/product/B000CRZXPI/ref=oh_aui_detailpage_o02_s00?ie=UTF8&psc=1
-Horn adapter wire $8.50 (this adapter keeps you from cutting factory terminal. Want to save $8.50? Then just cut the factory terminal that plugs into the horn and use a butt connector to extend the wire to wherever you end up mounting the relay).
Horn Adapter Wiring (pair) - 0S03 - College Hills Honda
-Custom bracket $10-$12 (bought a piece of 1/8" steel from Lowes. That's plenty thick). 3" X 3' (you only need a 15" piece but this was the shortest they sell).
-Two 6mm X 1.0 bolts about 1" long (to mount bracket) (also get lock washers and nuts)
-Two 5/16 lock washers (for mounting horns to bracket; the horns already come with nut but I'm anal and like to use lock washers)
-Roll of 14 gauge wire (stranded) $5-$10 depending on how big of a roll you buy
-Female Spade connectors for 14 gauge wire (think the blue ones are the correct size)
-30 amp fuse holder $5. (Since you're using a relay, you'll be drawing power directly from battery)
https://www.amazon.com/WirthCo-3182...B00DQ5JRUA/ref=sr_1_8?ie=UTF8&qid=1487988516&sr=8-8&keywords=30+amp+fuse+holder
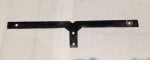
First, make your bracket. It's a "T" shape and is 3" tall by 14.5" long. The "V" at the top of the bracket is so the bracket will clear a bolt on the radiator support and lay flat against the support.
Edit: someone asked about making the bracket. Here was my reply.
"I have a bandsaw that I used for the general shape but at 1/8" thickness, you could use a saber saw with a good metal blade (will just take a little longer). Just make sure to clamp it down to a work surface (I know, I've broken blades and cut myself). I used a Dremel with a cut off wheel to make the two small inside cuts. And you can make the arms wider, say 1.5" , mine are a little over an inch wide."
You will be drilling 4 holes in the bracket. I used a 9/32" bit for the holes that mount the bracket to the radiator support. It's a little bigger than needed but gives you some flexibility in case you don't mark the holes perfectly. Just remember that they're 1.25" center to center. Then drill the 2 holes for the horns using a 5/16" bit about 1" from each end.
Look underneath the "H" on the grill and you will see two holes in the radiator support that are threaded (the pic shows them with the bolts in them). Screw in the two bolts from the front. You will mount the bracket from the backside of the radiator support using these two bolts along with lock washers and nuts; makes for a much cleaner installation (and if you remove the plastic support bracket as shown in the pic, will make it much easier to install bracket. Total of 10 bolts to remove it).
Mount the right horn (drivers side) on the bracket (take off the brackets supplied with the horns) using ground wire, lock washer and nut (just the one horn at this time. If you mount both, it will be hard to get bracket in place). Everything will go through the area to the right of the hood latch. Slip the loose horn down through this area and position it over on the passenger side.
Then slip the bracket down through same area. Bracket will mount to back of radiator support by slipping it onto the two bolts you previously installed, then lock washers and nuts. Level bracket and tighten nuts. Then mount the second horn to the bracket (remember ground wire). (the pic shows 3 bolts, disregard the bottom one, its holding the bracket for my radar detector).
That's as far as I've gotten today but think it's a really clean install so far. I still have to disassemble and paint the bracket and bolts flat black. As soon as I receive the adapter, I will come back and update with wiring instructions and pics. Hope this has helped some of you.
Edit: on the advice of TommyDevito I made a new bracket and moved the horns up a little to block less of the radiator (original bracket was larger, I deleted pic and replaced it with pic of new bracket). The bracket is now completely hidden behind the logo (and installed behind radiator support instead of in front but still uses same two bolt holes). I will run this setup for a few days to confirm no cooling issues and then post specs of it (update: no cooling issues at temps up to 90 so far in Vegas).
Read as many of the horn install threads that I could find but didn't see any that were comprehensive and could take a rookie (like me) from beginning to end. I'm mechanically inclined like a lot of people on this board but have never messed with horns before. The first time I read about installing a relay, it seemed rather complicated but once I saw a diagram, it's really not that bad. Hopefully this post will encourage those of you that are thinking about tackling this upgrade to get out in the garage and do it!
I'm still not finished and have one part on order (horn adapter wire) so I will come back and update this post with the wiring info in a few days when the part gets here. In the meantime, I will list all the parts needed and show you how I installed the new horns. The good news is that some of the posts said you can't do this upgrade without removing the front end but I'm here to assure you it can be done (and fairly easily). Only took me an hour or so to make a custom bracket and install the horns. I even unhooked the wire from the old horn just to make sure it can be done (removing the battery when I actually complete the wiring will make it a lot easier).
First, total cost should be around $50-$60 and that's assuming you don't have a piece of scrap metal laying around to make the bracket. And the radiator support has two welded nuts on it where you will bolt the custom bracket (no drilling on your precious truck!). Here's what you need:
Hella Horn Kit $30 (has really good reviews on Amazon but any two horn kit will work) (and it comes w/relay which is the right way to hook it up)
https://www.amazon.com/gp/product/B000CRZXPI/ref=oh_aui_detailpage_o02_s00?ie=UTF8&psc=1
-Horn adapter wire $8.50 (this adapter keeps you from cutting factory terminal. Want to save $8.50? Then just cut the factory terminal that plugs into the horn and use a butt connector to extend the wire to wherever you end up mounting the relay).
Horn Adapter Wiring (pair) - 0S03 - College Hills Honda
-Custom bracket $10-$12 (bought a piece of 1/8" steel from Lowes. That's plenty thick). 3" X 3' (you only need a 15" piece but this was the shortest they sell).
-Two 6mm X 1.0 bolts about 1" long (to mount bracket) (also get lock washers and nuts)
-Two 5/16 lock washers (for mounting horns to bracket; the horns already come with nut but I'm anal and like to use lock washers)
-Roll of 14 gauge wire (stranded) $5-$10 depending on how big of a roll you buy
-Female Spade connectors for 14 gauge wire (think the blue ones are the correct size)
-30 amp fuse holder $5. (Since you're using a relay, you'll be drawing power directly from battery)
https://www.amazon.com/WirthCo-3182...B00DQ5JRUA/ref=sr_1_8?ie=UTF8&qid=1487988516&sr=8-8&keywords=30+amp+fuse+holder
First, make your bracket. It's a "T" shape and is 3" tall by 14.5" long. The "V" at the top of the bracket is so the bracket will clear a bolt on the radiator support and lay flat against the support.
Edit: someone asked about making the bracket. Here was my reply.
"I have a bandsaw that I used for the general shape but at 1/8" thickness, you could use a saber saw with a good metal blade (will just take a little longer). Just make sure to clamp it down to a work surface (I know, I've broken blades and cut myself). I used a Dremel with a cut off wheel to make the two small inside cuts. And you can make the arms wider, say 1.5" , mine are a little over an inch wide."
You will be drilling 4 holes in the bracket. I used a 9/32" bit for the holes that mount the bracket to the radiator support. It's a little bigger than needed but gives you some flexibility in case you don't mark the holes perfectly. Just remember that they're 1.25" center to center. Then drill the 2 holes for the horns using a 5/16" bit about 1" from each end.
Look underneath the "H" on the grill and you will see two holes in the radiator support that are threaded (the pic shows them with the bolts in them). Screw in the two bolts from the front. You will mount the bracket from the backside of the radiator support using these two bolts along with lock washers and nuts; makes for a much cleaner installation (and if you remove the plastic support bracket as shown in the pic, will make it much easier to install bracket. Total of 10 bolts to remove it).
Mount the right horn (drivers side) on the bracket (take off the brackets supplied with the horns) using ground wire, lock washer and nut (just the one horn at this time. If you mount both, it will be hard to get bracket in place). Everything will go through the area to the right of the hood latch. Slip the loose horn down through this area and position it over on the passenger side.
Then slip the bracket down through same area. Bracket will mount to back of radiator support by slipping it onto the two bolts you previously installed, then lock washers and nuts. Level bracket and tighten nuts. Then mount the second horn to the bracket (remember ground wire). (the pic shows 3 bolts, disregard the bottom one, its holding the bracket for my radar detector).
That's as far as I've gotten today but think it's a really clean install so far. I still have to disassemble and paint the bracket and bolts flat black. As soon as I receive the adapter, I will come back and update with wiring instructions and pics. Hope this has helped some of you.
Edit: on the advice of TommyDevito I made a new bracket and moved the horns up a little to block less of the radiator (original bracket was larger, I deleted pic and replaced it with pic of new bracket). The bracket is now completely hidden behind the logo (and installed behind radiator support instead of in front but still uses same two bolt holes). I will run this setup for a few days to confirm no cooling issues and then post specs of it (update: no cooling issues at temps up to 90 so far in Vegas).