Some of you might have seen my other thread, http://www.ridgelineownersclub.com/forums/showthread.php?p=1179225
Well, here's my best attempt at an install tutorial. It was below freezing so I forgot to take pictures of some steps. I'll try to explain the best I can.
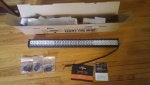
What's in the box?
1 - LED Bar (I bought an extra one for a friend)
1 - Wire Harness (some sellers don't include this)
2 - Brackets
4 - bolts
2 - Allen keys
2 - Rubber Feet
![Image]()
![Image]()
![Image]()
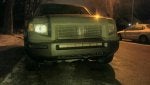
Initial Test
I wanted to make sure the LED bar wasn't DOA. I simply hooked it up to the battery. Was BLOWN away by the brightness.
(These pictures don't do it justice)
![Image]()
![Image]()
![Image]()
![Image]()
Removing the bumper
Read:
http://www.ridgelineownersclub.com/forums/showthread.php?t=2395&highlight=Front+Bumper+remove
And:
http://www.handa-accessories.com/ridgeline/frontgrille.pdf
Basically pop off the 7 plastic tabs, five 10mm bolts on the bottom, and two philips screws in the wheel wells. Pull gently on each side until the bumper pops out of the clips.
The bumper is extremely light and can easily be carried by one person.
![Image]()
![Image]()
![Image]()
![Image]()
Cutting the Bumper
First lined up the light to see if it would fit. It does")
![Image]()
Using a Dremel with a Cutting Wheel, I cut out the vertical posts and trimmed the black plastic up to the steel blue paint. (about 1/2 inch on all sides)
![Image]()
![Image]()
I used a file to clean up the edges.
Modifying the bracket
I drilled a hole 1 7/8" from the bottom of the bracket. These holes will be used to mount the light and make it the perfect height to shine through the newly trimmed hole.
![Image]()
Drilling into the bumper - fail
In the previous picture, you might have thought... "wtf is that strip of metal for?"
Let me explain.
At first, I planned to drill a hole straight through the metal bumper. Then securing it with 5" bolts, locking nuts, and washers.
I was unable to even make a dent into the bumper's reinforced steel... so... that was the end of that.
Maybe if you have nicer drill bits or a press, you can get through it. I don't so I moved to plan b.
![Image]()
Well, here's my best attempt at an install tutorial. It was below freezing so I forgot to take pictures of some steps. I'll try to explain the best I can.
What's in the box?
1 - LED Bar (I bought an extra one for a friend)
1 - Wire Harness (some sellers don't include this)
2 - Brackets
4 - bolts
2 - Allen keys
2 - Rubber Feet


Initial Test
I wanted to make sure the LED bar wasn't DOA. I simply hooked it up to the battery. Was BLOWN away by the brightness.
(These pictures don't do it justice)


Removing the bumper
Read:
http://www.ridgelineownersclub.com/forums/showthread.php?t=2395&highlight=Front+Bumper+remove
And:
http://www.handa-accessories.com/ridgeline/frontgrille.pdf
Basically pop off the 7 plastic tabs, five 10mm bolts on the bottom, and two philips screws in the wheel wells. Pull gently on each side until the bumper pops out of the clips.
The bumper is extremely light and can easily be carried by one person.


Cutting the Bumper
First lined up the light to see if it would fit. It does

Using a Dremel with a Cutting Wheel, I cut out the vertical posts and trimmed the black plastic up to the steel blue paint. (about 1/2 inch on all sides)


I used a file to clean up the edges.
Modifying the bracket
I drilled a hole 1 7/8" from the bottom of the bracket. These holes will be used to mount the light and make it the perfect height to shine through the newly trimmed hole.

Drilling into the bumper - fail
In the previous picture, you might have thought... "wtf is that strip of metal for?"
Let me explain.
At first, I planned to drill a hole straight through the metal bumper. Then securing it with 5" bolts, locking nuts, and washers.
I was unable to even make a dent into the bumper's reinforced steel... so... that was the end of that.
Maybe if you have nicer drill bits or a press, you can get through it. I don't so I moved to plan b.