Honda Ridgeline Owners Club Forums banner
1 - 16 of 16 Posts

Truckin'

· Premium Member
Joined
·
5,395 Posts
Discussion starter · #1 · (Edited)
We were told by friends before the cops pulled us over that we had a burned out tail light. We almost took our truck into the shop for this replacement but we decided to try it at home first. It was a simple job once we figured out about the posts holding the tail light assembly in place.

I thought I'd post pics so others can do this repair themselves with more confidence than we had.

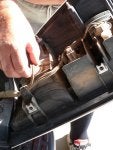
First you have to remove the upper and lower bolt on the inside of the tailgate. The lower bolt hole is barely visible in the picture. Our light burned out on the passenger side so it's by the latch, not the hinge, of the tailgate. We added that reflector tape on the right side of the picture when we first bought the truck.

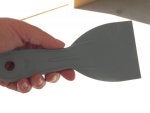
This plastic putty knife proved to be the perfect tool to carefully ease the light out of its tight hold.

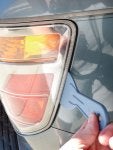
We were told it was a delicate process to get the light out without breaking the posts that hold it in, so we took time to work the light out slowly by wiggling top and bottom of the tail light on the side of the truck.
 

Attachments

Discussion starter · #2 ·
In the first photo you can see the two posts on the outside edge of the tail light and the two white grommets that hold them in the middle of the photo.

The next photo is the inside cavity where the tail light sits. In the bottom you can see that we didn't disconnect the wiring pig tail.

Next is the light assembly on the rear bumper step.
 

Attachments

Discussion starter · #3 ·
Our burned out bulb was on the bottom. Gently twist to get the connector and bulb out.

Then pull the bulb from the connector.

I got the replacement bulbs at Pep Boys. I think they cost $7 for two bulbs so now we have a spare.

Push the bulb in the connector then put the connector back in the light assembly.
 

Attachments

Discussion starter · #4 ·
Now line the assembly up to push it back into place.

You can still see the top receiving grommet in the top center of the second photo.

Line up both posts with the grommets.
 

Attachments

Discussion starter · #5 ·
Give it a good push once it seems to be in line.

It takes a strong push with the heel of the hand while cupping around the assembly to get it in place.

Then replace top and bottom bolts.
 

Attachments

Discussion starter · #6 ·
Oops! Learn from our error. Don't bolt it up before checking the fit. I looked at the side and discovered a gap large enough to easily slip the putty knife behind the assembly. Not OK!
 

Attachments

Discussion starter · #7 ·
We had to undo both bolts and give it a much stronger push to snug it into place.

This is what it should look like when it's properly seated.
 

Attachments

Discussion starter · #8 ·
Happy home repairs to you! Save yourself some time and money by not taking this simple repair into to the shop. :act010:
 
Pro-tip, don't touch the glass of the new bulb with your bare hands. You'll transfer skin oils to it, causing a hot-spot when the bulb heats up. This shortens it's life. Wear gloves, or use a paper towel to insert the new bulb into the socket.

Chip H.
 
Pro-tip, don't touch the glass of the new bulb with your bare hands. You'll transfer skin oils to it, causing a hot-spot when the bulb heats up. This shortens it's life. Wear gloves, or use a paper towel to insert the new bulb into the socket.

Chip H.
That only applies to halogen bulbs, ie headlights not generic stop light etc bulbs.


Sent from my iPhone using Autoguide.com App
 
CAVEAT. The bulb must be inserted correctly or no brake light. I replaced the burn out bulb and thought I was good. Luckily, my BIL told me before I got a fix it ticket.

IIRC, no visible clues for reference.
 
1 - 16 of 16 Posts