Honda Ridgeline Owners Club Forums banner
241 - 260 of 282 Posts
I also have some push mount cable ziptie coming so I can secure the harness better should the others fail.
Just got the push mount zipties.....

Image

Image


Image


Image
 
On my '19 RTL-E, I had the lighted running boards. Lights were decent, but the running boards were big enough to be in the way, and too small to use. IMO.

I now have a '23, with the black running boards, no lights. The black running boards are about an 1" wider and it's noticeable in function. Now I just need to add lights.

Anyone add lights to their black running boards?
 
Anyone add lights to their black running boards?
That's what Im doing. You have the same OE die-cast running board. I believe others have done it too but not using the mounting bolt and bracket method.
 
Thanks. You provide links to everything I would need?
With all due respect….Part numbers, etc are all listed throughout this entire thread. I recommend you read it, and read it again so you know what others have gone through and what you're getting yourself into.

I used the OE "Y" harness. Oznium 1W no lens, OE harness for the actual puddle lights and the toyota connector. Everything else (4' aluminum flat stock and M8 30mm 1.25 flange bolts)was from a local Ace Hardware. Oh and yeah Amazon for the zip ties mounts.

Once I get the rest of the oznium light, I will create my harness for each and update my post to include that.
 
Discussion starter · #246 ·
Just got the push mount zipties.....
I think those zip ties were a good call, gives a nice secure factory appearance too. I really like your custom bracket idea for the LEDs. I need to purchase a set of those Toyota connectors. Right now my factory LEDs are still ok but it'll make customization a lot easier when they finally fail.
 
With all due respect….Part numbers, etc are all listed throughout this entire thread. I recommend you read it, and read it again so you know what others have gone through and what you're getting yourself into.

I used the OE "Y" harness. Oznium 1W no lens, OE harness for the actual puddle lights and the toyota connector. Everything else (4' aluminum flat stock and M8 30mm 1.25 flange bolts)was from a local Ace Hardware. Oh and yeah Amazon for the zip ties mounts.

Once I get the rest of the oznium light, I will create my harness for each and update my post to include that.
I had only skimmed it, but I think I’m taking a different route. I’m going to order the floor sill harness and work a light rail, instead of individual lights or tape. I have to look underneath first to see what can work. I’m tracking down the deutsch connectors tomorrow.
 
  • Like
Reactions: rzc
I think those zip ties were a good call, gives a nice secure factory appearance too. I really like your custom bracket idea for the LEDs. I need to purchase a set of those Toyota connectors. Right now my factory LEDs are still ok but it'll make customization a lot easier when they finally fail.
Thank you. I most likely will move the bracket higher. As for the push mount zip-tie, I wish I got them in black though. Get the connectors before they ran out again.
 
Finally received the Ozniums tonight. Just finished making my harness'.

I heat shrinked the Oznium to protect it more from the elements.
Image


soldered the wires to the toyota harness
Image


wireloomed then wrapped with vinyl tape and ready to go.
Image


I can't wait to install them tomorrow.
 
Two quick questions:
1. Are the Neutral color lights warmer than the DRLs?
2. From the pics it seems the 16mm rock lights might fit the OEM housing or are they just too big?


This is the detailed write-up and How-To for my Oznium LED retrofit into the OEM honda puddle light kit. I considered making this it's own thread but was not sure if would just get combined. The moderators can always peel it off and make a new thread if they think it would be helpful, I of course selfishly think it would be.

Title: OEM puddle light kit LED retrofit with aftermarket LEDs

Purpose: This write-up serves as a guide if you choose to retrofit the LEDs from the Honda OEM Puddle light kit with aftermarket Oznium LEDs. It does not include steps that are already resident in the OEM instructions if you are installing from scratch. Consult those instructions for how to wire the harness through the floor and into the pre-wired ports on driver and passenger side.

Material:
View attachment 413339
Oznium LEDs (6 required) [See manufacture website for detailed specs on the LEDs and housing]

Flush Mount LED bolt, size 11 mm

LED Color/Temp: Neutral White (matches OEM headlight color nicely)

Wattage: 1W

Material: Black aluminum

No lens

Washers, diameter depends on the LED you buy. I brought my LED to the hardware store and tried options until I found the one I wanted. My goal was secure mounting and pleasing aesthetics when my head is under the truck. I used nylon washers to avoid long term dissimilar metal corrosion with the aluminum LED housing, and they don't rust.

Rubber washers (6 required)

Nylon washers (12 required)


Bracket modifications:

Remove the bracket support that is held on with the philips screw, cut off the tab that keeps the OEM LED from falling out. I used a hacksaw and it worked great. After cutting, file down any remaining burrs to prevent chaffing of the new LED wire. Cutting this tab will help give enough clearance for the wiring in the Oznium LEDs. Your bracket is ready for re-assembly.

View attachment 413347

View attachment 413342

Assembling the light:

After modifying the bracket, assemble the LED and washers into the OEM bracket as shown in the picture. Left to right will be: LED bolt without rings, rubber washer for aesthetics, nylon washer for support, OEM bracket, nylon washer for support, and finally the two locking rings that came with the LED. The washer will sit awkward in the recess for the OEM light, position it off center to bias the light to shine more outward than down when mounted, this bias will also make the washer seat more evenly when tightening down. Once the LED is mounted and snug, re-attached the bracket you removed and modified, you should have just enough clearance for your wiring as seen in the picture. Your light is read for installation. If you have an auxiliary battery, now is a great time to test the LED on a 12VDC source prior to installation in the vehicle.

Assembly order:
View attachment 413343

Wiring clearance:
View attachment 413344

Light ready for install: (note bias of LED/washer to the top of the bracket when viewed in this orientation)
View attachment 413345

Wiring:

Peel the tape and loom from the OEM harness in all 3 connector spots. Remove the OEM connectors by cutting wires, it is up to the installer how much wire to leave if protecting against a future OEM re-installation. I chose to insulate and tape off the front and rear connector points and only use the middle connection point. This spot gets significantly less debris during winter and reduces water/snow buildup near the electrical connection point. I chose not to use the back connector simply to reduce the amount of electrical joints, it is personal preference.

Strip the power and ground for each wire in your LEDs, as well as the OEM harness. In the OEM harness you will find a blue/aqua and pink wire. Pink is ground and blue/aqua is +12V. There is an inline 2A low profile mini-fuse near the connection inside the cab if you need to troubleshoot power supply. It is the users option to make the electrical connection via connector or splicing and using crimps or solder. Make every best effort to use waterproof connections.

View attachment 413348

Once the wiring is connected to the truck, test the lights by opening the door to verify electrical connectivity. Once verified, finalize wiring based on user preference for tape/loom etc. I added the new wiring along the existing harness and added a thicker loom to encapsulate all wiring. Once in the loom, secure via zip-ties as recommended in the OEM instructions.

All done:
View attachment 413349

View attachment 413350

Any questions just ask me.

-Mike
 
@rzc I liked everything I saw, how did the lights turn out?
Turned out great. I ended up replacing all the flange bolts to serrated stainless 316 flange bolts and torqued them all to 20#. And left the lights under the running board rather than moving it higher.

I do see some dark spots so I'm debating to add more lights or not. Plus I'm thinking of adding 2 at the back, just figuring out of I should tie-in to the bed LED or the existing puddle lights harness.

Image

Image
 
That turned out really well, @rzc. Thank you.
 
  • Like
Reactions: rzc
The honda ones have some dark spots too but it looks like your setup really lights up the area well. Looks super bright and a nice spread. (y)
I may leave it. It's growing on me. Thanks to you for starting the thread and idea. And to everyone else that responded with their contributions leading to me coming up with my own twist to an amazing idea that you started. Onto the next thing.
 
My ridgeline is slowly transforming into a Pilot... C'mon Honda why do Pilots get all the accessories? I know you want me to buy running boards but not everyone wants those.
I wasn't interested in installing running boards, but did like the idea of the lights they come with. I noticed that the Pilot accessories list just the welcome lights. The instruction's list only the Pilot and Passport. I took a gamble and ordered up the kit. It installs just like the instructions, no need to modify anything on the truck.
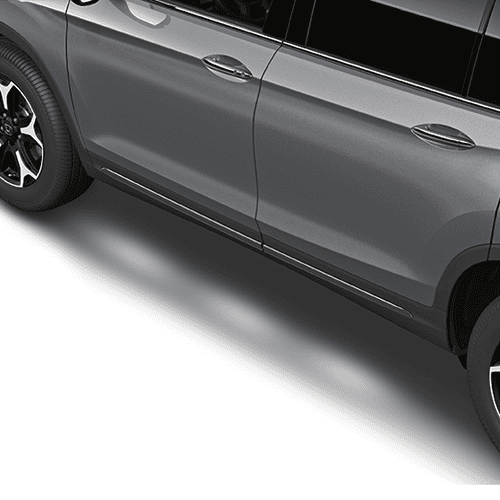
*Update 4/16/21 : Many users of this kit, myself included have had issues with the LED modules failing. Please make sure you read the entire post before deciding you want to use these lights. I'm still happy with the mod, but it definitely has reliability issues.

Kit is pretty basic, 3 lights, hardware, and a harness for each side.
View attachment 406084

The plastic under pieces on the sides have the spots marked for where to cut to install running boards, these also work for the lights. Easily trimmed with a razor knife. Lights install in pre tapped holes using supplied bolts.
View attachment 406085
View attachment 406086

There are 3 "A" lights and 3 "B" lights. The instructions for the Pilot say to install ABA on the driver and BAB on the passenger. When I did this the center lights was totally misaligned. I installed AAA on the driver and BBB on the passenger and things looked like they should.
View attachment 406087

The wiring runs down the plastic attaching with zip ties. You remove a grommet under the carpet where the floor mat is, and the wiring feeds though, with a new grommet.
Passenger side is visible, Drivers side you need to remove a few pieces of hardware to get inside the plastic shield.
View attachment 406088
View attachment 406089

With the kick panels and door sills removed only one clip needs removed to lift up the carpet.
View attachment 406090

New wiring then routes over to the factory wiring under the sills and up to the dash, where there is an unused connector waiting on each side.
View attachment 406094

Lights come on anytime the dome light is on, door opened or unlocked with the fob. They light up a pretty large portion of the floor too.
View attachment 406092 View attachment 406093
 
I used these great directions to install the lights on my 2020 Ridgeline. Unfortunately, three LEDs have failed. Two after they were out of warranty. The replacement LEDs are ridiculously expensive. These appear to be poor quality LEDs!
 
I have some rock crawler lights I am planing on doing my own. In addition to my front and rear footwell lights. I got the harness to plug into the factory plug and it has 2 output plugs one for the door sills I’ll use for the footwells and one for the under rocker lights.
 
I have some rock crawler lights I am planing on doing my own. In addition to my front and rear footwell lights. I got the harness to plug into the factory plug and it has 2 output plugs one for the door sills I’ll use for the footwells and one for the under rocker lights.
Is this the wiring harness you have? 08V27-TG7-10030 - Genuine Honda HARNESS, WELCOME LIGHT

I have after market runners right now. I am trying to figure out which harness I need if I wanna drill and place these under the truck. Since the holes are already being used by the runners.

I don’t wanna splice or anything. Might be more work to run everything but less headaches.
 
241 - 260 of 282 Posts